Tuesday, October 29, 2013

Santos China Doll Tutorial

Do you love Santos dolls as much as I do?  Every since scoring my first reproduction Santos doll a few years ago (see her transformation here), I've been on the hunt for more.  But they are expensive - even many of the reproductions.  Not long ago, I happened across an upper body of a china doll on Ebay.  The wheels started turning...and I got the idea to use her for a homemade Santos cage doll.  I wanted it to be an easy project and it was!  (of course, after some missteps which I learned from along the way)
Here is my finished doll....and a tutorial for you!!!

Crown creation by talented Amy

This is the vintage china doll piece I found on Ebay:

She was a curious find - someone had sewn her upper body to a circle of cardboard.  Perhaps this person originally had a similar project in mind?
I got the idea to attach this cardboard base to a 'cage' in order to create my own Santos cage doll.
I decided to mimic the base that is on the Santos cage doll I already owned, formed of simple hollow circles.  What better choice to use for this than wood embroidery hoops?  I bought two sets of hoops large enough to hold my doll.  The top hoop is 5" diameter and the bottom hoop is 8" diameter.  I also bought a 7" diameter flat wood circle.  These all came from AC Moore craft store.
As you can see in the following photo, I chose to remove the outer circle (with the tightening screw) from the large hoop.  I left the outer circle on the smaller embroidery hoop for added stability on the top (plus I knew the screw wouldn't be seen in the back).


First I glued the flat wood circle evenly onto the smaller embroidery hoop (sorry, didn't take a photo of that).  You can choose to do this now, or wait until after you've attached your slats to the hoops.

Next I needed wood slats for the 'cage'.  I bought three 24" x 1/2" wood slats, also at the craft store.  I sawed each in half to be lengths of 12".  (You may find these in lengths of 12" at the store.  I bought them longer, not knowing how tall I wanted my cage just yet).  Sand the sawed edges for smoothness.


Here's where I made my first 'misstep'.  I attempted to glue these slats to each embroidery hoop, evenly spacing them around both the large and small hoops.  The glue didn't hold well and the structure was a bit wonky.  So....brads to the rescue!  These are 5/8" long brads I found at the scrapbooking section of the craft store:

I drilled 6 small holes evenly spaced around each embroidery hoop, and the top and bottom of each wood slat.  Then I fastened each brad through both the wood slat and the hoop.  Here is the finished wood structure, which is much more stable:

Next I painted the whole wood structure a creamy white (except the top of the circle, which I knew would be covered).
Here is a closeup of the china doll as she was attached to the cardboard.  Since I found my doll this way, I didn't have to do anything here.  But if you find or already have a china doll (or parts), you can have fun with re-structuring her.  This would be a great way to recycle an old doll whose legs have detached.  Simply sew on the cloth body to a sturdy cardboard circle.


I trimmed my doll's cardboard circle to exactly fit my flat wood circle on the top of the cage structure.  Next, I wrapped a circle of muslin fabric around the cardboard.  I simply placed the doll on top of the fabric and gathered it up around her bodice, gluing it in place.  Then I glued the bottom of the doll to my wood circle on the cage:

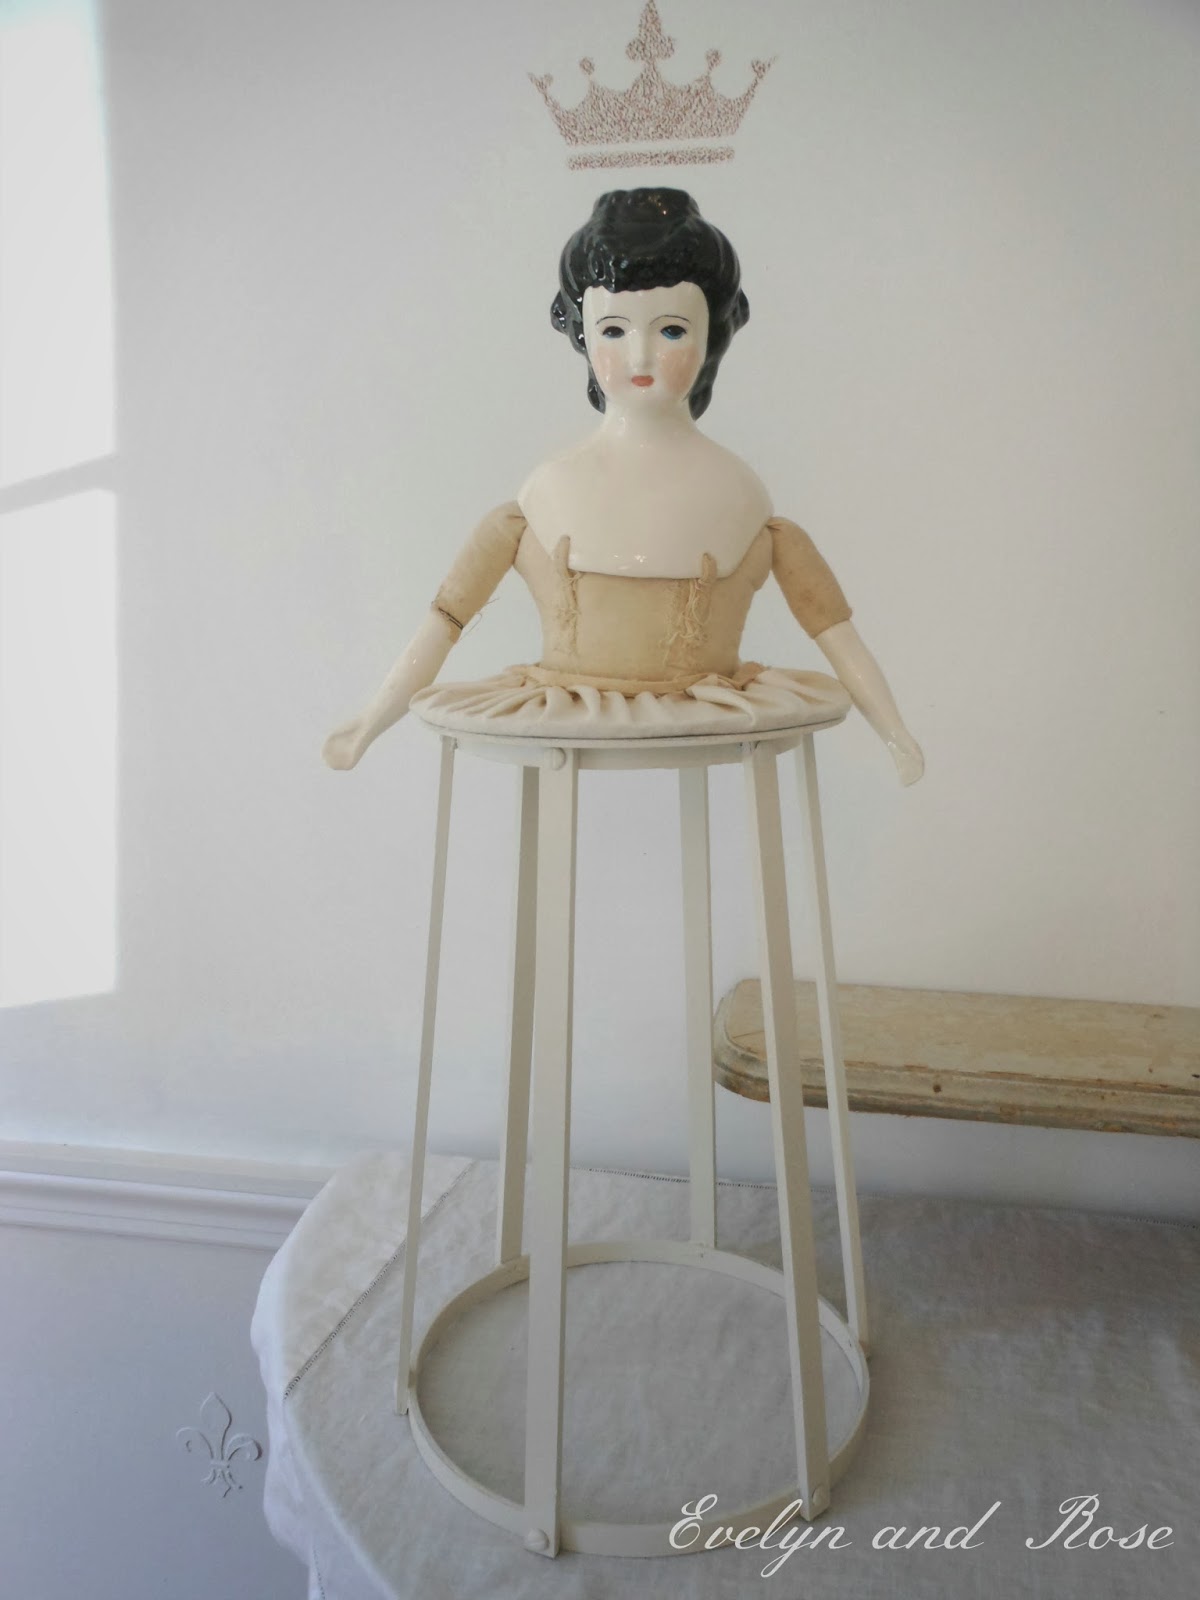
So here she is, assembled and in her simple state.  I placed her against my dining room wall with a stenciled crown above, giving her an aura of royalty:

Okay friends, here comes the fun part - fancying her up!  I wanted her to have the option of wearing a gathered white tulle skirt when she feels like it (she'll let me know).  I gathered up soft crushed tulle on my sewing machine, measuring the height of the cage and about 2-3 times the length of her waistline:

I simply set the skirt around her waist:


This china doll needed a bit of 'fancy' up top, so I decided to add ruffles to her neck and elbows (where the fabric seam met the porcelain arms).  I had some white crepe paper lying around, which I stained with tea and crinkled up to look aged:

I measured out various lengths of the crepe paper - two pieces at 3 times the length around her elbow and one piece 3 times the length around her neck.  I folded each piece in half lengthwise:

Next I gathered up a loose seam down the center of each piece on the sewing machine:

I carefully gathered the crepe paper by pulling gently on the threads at each end.  The resulting gathered piece is shown:

I gently tied each of these gathered crepe paper pieces around the elbows and neck of my doll, using the loose threads to tie with.  You could also hot-glue these pieces in place, but I know this may be a seasonal look for my doll (she'll demand a change of outfits in the future, I'm sure):

Voila!  She's done (for now).  Here's my Santos china doll, wearing a regal crown made by the talented Amy of Vintage Marketplace.


And here she is again, with a simpler look sans skirt:


I do hope this tutorial inspired you to go out and make one for yourself.
Be creative - we're never too old to play with dolls.  I'm already dreaming up ideas for her Christmas attire - miniature bells, a banner for her hands to hold, some sparkle...such fun!

If I find more of these dolls, I'll be sure to make some for my Etsy shop!

Sharing with:
Blissful Whites Wednesday
Be Inspired Friday
Feathered Nest Friday
Shabbilicious Friday

Monday, October 28, 2013

Simply Fall in the Dining Room

As I type this post, I am looking out my window to the most glorious autumn foliage.  We are truly blessed here in New England.  Our dining room has undergone a fall transformation too, with simple touches of rustic warmth.
Behold...the 'twig' arrangement!

After windy days, we often find tons of twigs in our large front yard - what better way to recycle them than in a grandiose arrangement?


I love the simplicity of this look.  Nearby rests my favorite white chair, stacked with embroidered linens.  I sometimes chuckle that this chair is 'overexposed' on my blog - it's probably the most photographed chair I own, and is used for all the pillow shots for my Etsy store.  I don't tire of looking at it though, so I just move it around from room to room for a new look...

Another corner of our dining room got a new look with this white bookcase, which I purchased for the Vintage Bazaar last month.  It came in very handy to display our wares, and now I'm using it to display rustic brown pieces, mixed with whites and silver...


I've recently added this small champagne bucket/trophy piece to the bottom shelf - just love the look of the tarnished collection:


The sweater pumpkins I made last year are now resting in this rustic old fruit crate I scored from a sweet vendor at the Vintage Bazaar.  I love it!


It's been a busy fall...getting projects done.  And yes..that means Christmas projects for my shop!  I can't wait to show you what will be available.
Also...I've got a neat Santos doll tutorial coming up soon...stay posted!

Sharing with:
Blissful Whites Wednesday
Be Inspired Friday
Feathered Nest Friday
Shabbilicious Friday

Tuesday, October 22, 2013

Just listed - grey delights!

I finally found time to list some of my hand-made items from the Vintage Bazaar last month.  They are now available in my Etsy shop.  No surprise - lots of grey in store!


I had quite a ballet theme going with some of these items, too...

I can never resist using fabrics from Tone Finnanger's Tilda's world collection.  Here are some sweet fabric buntings:

Hope you can stop by to take a look...
Also, make sure to visit Michelle's Grey Dey Thursdey party each week for lovely grey inspiration!

Sharing with:
Blissful Whites Wednesday
Grey Dey Thursdey
Be Inspired Friday
Feathered Nest Friday
Shabbilicious Friday

Friday, October 18, 2013

Witchy Woman Tags

Hello friends!   It's been a while since I shared a tutorial over here, but I've got several projects to share this fall.  First up....Witchy Woman stamped tags!

These soft white panne velvet pumpkins were made for the Vintage Bazaar last month.  For a touch of whimsy, I added Witchy Woman tags to each pumpkin.


They were created from simple silhouette stamps.  I found this set at the craft store:

I chose the silhouette on the left to be my "witchy woman".  The other gal looked too much like Barbie, whereas the first gal resembled Samantha from Bewitched.
I stamped her silhouette onto vintage paper from an old German book:

Next I simply drew on her witch hat with a sharpie pen:

So simple!!!  Strung with crinkled seam binding, these tags were just the right touch for my fall pumpkins.  I added some to a corner of our living room:


They're available in my Etsy shop, too!

Sharing with:
Blissful Whites Wednesday
Be Inspired Friday
Feathered Nest Friday
Shabbilicious Friday

Monday, October 14, 2013

Autumn Grace

Here it is Columbus Day, and I've finally put the last touches on the autumn decor in our home.  This year I'm really into gray, soft brown, tan and warm cream colors.    This corner of our living room got some pillows switched out and a new canvas drop cloth cover on the daybed:


I was able to line up a seam on the drop cloth with the edge of the mattress so that it almost looks custom fitted.  The grain sack hearts on the window were made for the Vintage Bazaar, and are now available in my Etsy shop.


These hydrangeas are aged to perfection, here in the urn on my corner desk:


The Santos doll got a rustic skirt for this time of year, fastened with twine:

I love to add ribbons to architectural posts:

Our two white chairs got new pillow covers, made from a soft panne velvet.  I thought the color was grey in the store, but now I see it has a greenish tint.

At first the pillow covers were a simple square, but I thought they looked too plain.  I ended up gathering up the front of the pillow cover for a ruched effect.  It's more interesting now, and echoes the soft lines in the pumpkins:

I can't decide if this large pumpkin is grey, blue or green, but I love how it looks on this table:

Now if you're loving grey lately like me (I know there's a lot of you out there!), you will adore this book called "A Life Less Ordinary" by Zoe Ellison and Alex Legendre.  The authors own a cool store in England.  I caught a book review in the English version of Country Living magazine not long ago.


Take a look inside....I just adore these bedrooms and want to do our bedroom over just like them:


Have a great week friends!

Sharing with:
Blissful Whites Wednesday
Grey Dey Thursdey
Be Inspired Friday
Feathered Nest Friday
Shabbilicious Friday

Monday, October 7, 2013

November Romantic Homes Feature!

Am I dreaming?  Our home is featured in the latest November issue of Romantic Homes magazine!  This is such a treat, and quite a wonder.  In August Jacqueline deMontravel contacted me to say she stumbled upon my blog and photos of our Christmas home.  She is the marvelous editor of such a favorite magazine of mine.   I was so excited when she asked  me to share my photos in a holiday issue of Romantic Homes!  The talented Malena Jaime wrote a wonderful article to go along with the photos.
In the very same issue, Beth Livesay contributed a TaDa feature with some photos and tips I provided her.  That feature has a late fall decorating theme.  
Thank you,  Jacqueline, Malena and Beth!  You have made a New England girl so happy.

Here is the cover of the issue, which showcases the gorgeous home of Cindy at Cute Pink Stuff.  Her article is amazing.
  
The article with my late fall tips can be found in the TaDa section:


The article featuring photos of our home at Christmas last year is called 'Silver Bells'.  I love that Christmas song!:


I had the surreal experience of shopping the magazine aisle at our local grocery store, and opening to these pages.  What fun!  Be sure to pick up a copy - it's a thick issue, filled with great holiday ideas.  

Thank you Romantic Homes!
Related Posts Plugin for WordPress, Blogger...